[ home | research
| personal | resume
| links ]
Setting up MICE
(last modified in 2002)
Required operating system
The current version of MICE has been written in IDL (versions>5) for
UNIX and LINUX operating systems.
Installing MICE
Create a mice directory with subdirectories tables, seds
and routines. Now download, g-unzip and un-tar the three files with
the contents for the subdirectories
tables,
seds
and routines.
Define an environment variable MICE_TOP in your
.login file, pointing to the mice directory. Example:
setenv MICE_TOP /home/hspoon/mice.
Now adapt the predefined paths to tables and source codes in file
mice_file_table.pro.
Creating the MICE color tables
The MICE plotting routines take their colors from a special color table;
either mice.colortable or mice.greytable. These color
tables can be created upon installation of MICE by typing:
IDL>create_mice_colortable
IDL>create_mice_greytable
The two tables should be placed into the tables subdirectory.
In order to correctly load one of these color tables, your startup.idl
file should be appended with the following line:
WINDOW,COLORS=200,/PIXMAP & WDELETE
This ensures that IDL can reserve 200 colours. A larger number of
reserved colors is also acceptable. MICE will however only use the
first 200 then.
To test whether the color table is installed correctly type:
IDL>micecol
IDL>plot_mice_colortable
and compare the result to this plot.
Installing Cloudy for MICE: currently C96 beta-4
Create a cloudy home directory with subdirectories source
and data and
download
the two gzipped tar files that the Cloudy C96B4 distribution consists of.
Put the two files in their respective subdirectory (source and
data) and g-unzip and un-tar them there.
Incorporate all
"hot fixes"
known for the current version of Cloudy. Give variable npunlm in
file punlin.c the value 1500L. Finally, follow the
recipe
to edit the path in file path.c to point to the Cloudy data
subdirectory.
For Sun Solaris the Cloudy executable is generated by typing:
cc -Xc -lm -fast -c *.c
cc -fast -o cloudy.exe *.o -lm
For Linux the Cloudy executable is generated by typing:
gcc -ansi -c -O3 -ffast-math -Wall *.c
gcc -ffast-math -o cloudy.exe *.o -lm
If you have installed gcc version 2.96 (check by typing gcc -v),
use kgcc instead. Details regarding the compilation can be found
here.
Now make sure that the path to the Cloudy executable in MICE file
mice_file_table.pro points to the right directory.
Installing STOREY for MICE
Create a storey home directory. Download the Fortran code
storey.for and the accompanying
data file e1b.d. The code computes
hydrogen recombination line strengths for a given electron density and
electron temperature
(Storey & Hummer 1995).
In storey.for, change on line 123 the path to file e1b.d
to point to the storey directory.
The storey code can now be compiled using the following command:
gfortran storey.for -o storey.exe
Now make sure that the path to the Storey executable in MICE file
mice_file_table.pro points to the right directory.
Test the MICE setup
In order to find out whether you set up MICE correctly, you should
download the mice.test.input file
and go through the following steps:
- At the IDL prompt type:
IDL>make_cloudin,'mice.test.input',nzones=1,/NoCleanUp
This command should produce four new files in your working directory:
cloudy.sequence, mice.sequence, mice.griddef.xdr and
intern_s1.in
- At the UNIX/LINUX prompt you can start the Cloudy computation with the
following command:
LINUX>./cloudy.sequence
If Cloudy has been installed correctly, the computation will produce the
following output files: intern_s1.main, intern_s1.flux1,
intern_s1.flux2, intern_s1.cont1, intern_s1.cont2
and intern_s1.geom.
- At the IDL prompt you can start reading in the Cloudy results into MICE
with the following command:
IDL>@mice.sequence
If MICE has been installed correctly (paths in mice_file_table.pro
set correctly?), this produces an IDL XDR file named
res.save
- At the IDL prompt now type:
IDL>micewin
to create the MICE plotting window.
- Followed by:
IDL>micecol
to load the MICE color table.
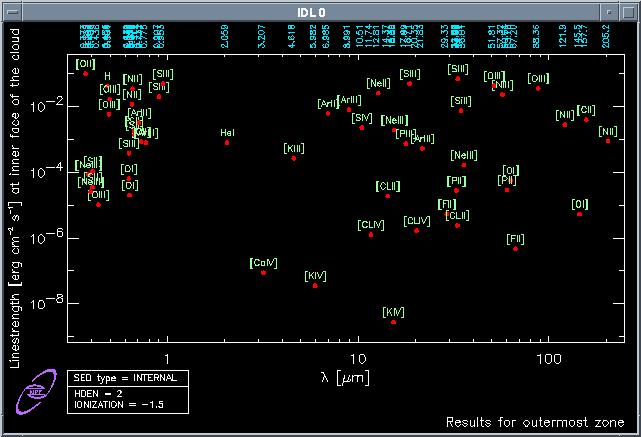
- The test run finishes by plotting the line strengths of several
tens of forbidden lines on screen:
IDL>plot_linespec,res
Your MICE plotting window should display this.
If the colors do not match, your computer has difficulties assigning the MICE colors.
I don't know any solution to this problem yet.
Get the MICE input template
I recommend to download my template mice.input
file. I always start from this file when I want to define a MICE grid.